Tuesday, May 31, 2011

Summer is here!!!!!!

Summer is here... school is out! I am so ready for summer!!


I have so many big plans and projects that I cannot wait to get done. My biggest plan is to get my middle bedroom fixed up. Last summer we were just moving in and did what we could quickly and easily. This summer, I am up for a bigger challenge. I have found so many inspiring blogs. My favorite bedroom inspiration came from Dear Lille. You have to check out her blog and all of the fabulous decor she has in her home.


A few plans I have:

Bedroom makeover

card table tablecloths

2 wedding showers

lots of cooking and baking, too!
Sunday, May 22, 2011

Show us Your Life... Main Dish Recipes

Paula Deen's Oven Fried Chicken

Today, I am participating in Kelly's Korner Link Party "Show us Your Life: Main Dish Recipes". This is by far our favorite Chicken recipe and I love to make it! We made it for the first last year on Valentine's Day with Macaroni and Cheese and Lemon Asparagus;

it was D-E-L-I-C-I-O-U-S!


Ingredients
2 cups Panko bread crumbs
1 cup grated Parmesan
4 tablespoons olive oil, divided
2 tablespoons freshly minced thyme leaves
Kosher salt and freshly ground black pepper
1/4 cup Dijon mustard
2 tablespoons water
2 1/2 pounds boneless skinless chicken breasts, pounded to 1/4 -inch thickness


Directions
Preheat oven to 400 degrees F. Line a baking sheet with heavy-duty aluminum foil. Place a cooling rack over pan and spray rack with nonstick cooking spray. In a shallow dish, combine bread crumbs, cheese, 2 tablespoons olive oil, thyme, salt and pepper, to taste. In a separate shallow dish, combine mustard, water, salt and pepper, to taste, and remaining olive oil. Coat each chicken breast with mustard mixture; dredge each in bread crumb mixture. Place on prepared rack in pan. Bake for 25 to 30 minutes, or until chicken is golden brown. Serve immediately.


recipe from Food Network

Saturday, May 21, 2011

Our Mother's Day gift to my Mom...


My brother and sister and I wanted to something special for my mom and we came up with idea of having a family portrait session! We went with a Fort Worth Photographer-- Amanda Lynn! She was awesome and did a great job! We celebrated Mother's Day on the same weekend as Taylor's graduation-- so we were busy! Amanda, the photographer posted a preview on her blog. Read more here: http://amandalynnphoto.com/blog/?p=1430


ENJOY!


Monday, May 16, 2011

Taylor's Graduation Weekend


This weekend was a monumental one in our "scrapbook"! Taylor graduated law school this weekend and we had one big shin-dig! From the party, there is one project/idea I wanted to share with you all!


**Appetizer Trays**


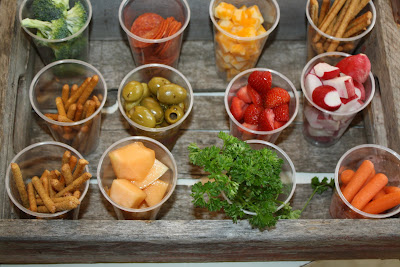
I began this project about a month ago when I went shopping in Fredericksburg with my parents. I found these old coke crates for $4-5 a piece. I bought 4 of them and decided to use them as decorative appetizer trays at the party.


The next step was getting all the food prepared. I bought all kinds of veggies, crackers, cheeses, meats and dipping sauces. Each crate was different and there were small 9 ounce cups in each one that were filled to the top with the yummy snacks.


The parsley was added just for eye candy! The trays was a great hit and I got a lot compliments on them. It was such an easy way to lay out the food and it even made for an easy cleanup. This idea would be great for any BBQ dinner!


linking to:


The Girl Creative, Craftomaniac, DIY Showoff

Monday, May 2, 2011

Wall of empty frames...

This project began back in January when I hung my first 3 frames. This is a little wall in the dining room & that was only the beginning!


Little by little, I found frames here and there all under $7.00. My latest 2 stops were Dollar Tree and Goodwill. Goodwill was the biggest bang for my buck where I was able to grab 2 11x14 frames-- one for $4 and one for $1.55. That was a steal. The goodwill frames did come with some super hideous pictures that I threw out right away. Dollar Tree was a good place to get some frames for a buck a piece! They are not wood ( like most of the frames) they are plastic. I only picked up 5 or 6 at Dollar Tree. I had to have a variety of sizes and textures.


The frames were all different colors-- so I used a little spray paint to give the creamy color I wanted! Thanks to my hubby who is busy busy busy studying for his last semester of law school finals for hanging these babies!!!


Finally, my frame wall came to life just like that!!


Sunday, May 1, 2011

Party Hats AGAIN!!


Remember these cute little party hats that I made a couple of weeks ago... Well, today I am showing a more "refined/mature" party hat that women could wear!! I had the help of family friend on this project because it required some sewing-- I will get the hang of that this summer!!


To begin, you will need a few things:


--embroidery paper


-- ribbon


--sewing machine


--hot glue gun


We began by giving the ribbon a little more character. First, we pressed the ribbon with a crease to help guide our stitches. Then, we sewed a line straight through the center of the ribbon. Next, we pulled one thread and bunched up the ribbon. This was tedious and I was so afraid to break the thread; but it was strong!


And viola! We had cute ribbon!


Our next step was cutting the paper. We did a 51/2" sized hat and marked off 51/2" in a few spots on the paper to guide our scissors. Then, we added the ribbon. We tried our best to stay right on top of the first stitch!


With the left over ribbon, you could add a little rosette to the top of the hat! I then hot glued the hat to the headband so that it could be more easily. I hate the elastic strap that is on party hats-- I think the headband makes for an easy on and off! Just a dot or two on the ribbon will keep the hat in place on the headband!


ENJOY!


I am linking up to:


The DIY Show Off


The Girl Creative


craft


A Crafty Soiree


A Little Knick Knack


Tip Junkie handmade projects


Tatertots & Jello


Creations by Kara


It's FUN to Craft


It's a Hodgepodge Life