Showing posts with label party. Show all posts

Sunday, March 16, 2014

Luke is 2!

It is so hard to believe that our Little Dude is 2 years old... 2 years old!!  He is the most joyful little boy around and we love him so much.  Luke has such a fun spirit and is happy to just be at home with his mommy and daddy.  He is such a chatter box and it is hard to keep track of his vocabulary nowadays.  Here are a few of our favorites: "Sit down right there, I love you so much, I go outside"  Luke is weighing in around 25 pounds and eating like an absolute champion! Luke is in love with anything tractors, cows, farm and trains.  This year, Luke's party was tractor themed.  We found the best park that was an old dairy farm turned suburban park.  It could not have been more perfect!

All about the party:
Frosting and Ink - all printable party decor
Hot Chocolates Bakery- cake
Tee With Sugar- personalized birthday shirt


Chocolate covered donuts

Chex-Mix


Rice Krispie Treats


We have the greatest friends and family and we appreciate them all celebrating Luke with us!

Luke and his Godparents, Courtney and Matt.


Still hard to believe that our baby boy is 2 years old!
Happy Birthday to you, Luke!

Surprise 60th Birthday

Back in January we had a surprise 60th birthday party for Taylor's mom...  It was pretty simple as far as decorations go.  Here is a picture recap of the party and some fun ideas for a party!  We had a black, white and gold theme to the decorations.  That was a great color choice and shopping was a breeze.  


Photo Banner in dining room
We were able to get several pictures of Mary from her younger years.  We scanned them all and had our copies printed for the party. The photos are taped (duct tape) to black and white twine.  This project was CHEAP and SO EASY.  


Photo Booth 
In our office, which is totally empty and undecorated, we had a photo booth.  This was my favorite part.  We made the backdrop with wrapping paper. ($10) and added a chalkboard bunting banner. ($5)  We had several photo booth props in the room and our guests enjoyed some photo-ops! 


Luke loved the mustaches!


Surprise Face Masks
One of the cutest ideas I got from pinterest was creating face masks for the big surprise!  We printed Mary's face on 8.5x11 cardstock and cut the shape out around her head.  We hot glued the pictures to paint stirrers from Home Depot.  Everyone held a face mask up to their faces for the surprise.


We covered our kitchen table with a white table cloth to fancy things up a bit.  We served classic meats and cheeses on crackers and spinach dip with crostinnis.  All of the food came from Costco, it was delicious! 


Cupcake Toppers
We made our our personalized cupcake toppers.  We went with more old pictures of  Mary, "Happy Birthday Mary" and "60" for each topper.  We used a circle cutter and glued the paper pieces to toothpicks.  This project was a tad time consuming, but I liked the personal touch it added!


Monday, May 16, 2011

Taylor's Graduation Weekend


This weekend was a monumental one in our "scrapbook"! Taylor graduated law school this weekend and we had one big shin-dig! From the party, there is one project/idea I wanted to share with you all!


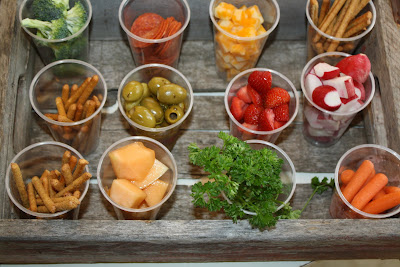
**Appetizer Trays**


I began this project about a month ago when I went shopping in Fredericksburg with my parents. I found these old coke crates for $4-5 a piece. I bought 4 of them and decided to use them as decorative appetizer trays at the party.


The next step was getting all the food prepared. I bought all kinds of veggies, crackers, cheeses, meats and dipping sauces. Each crate was different and there were small 9 ounce cups in each one that were filled to the top with the yummy snacks.


The parsley was added just for eye candy! The trays was a great hit and I got a lot compliments on them. It was such an easy way to lay out the food and it even made for an easy cleanup. This idea would be great for any BBQ dinner!


linking to:


The Girl Creative, Craftomaniac, DIY Showoff

Sunday, May 1, 2011

Party Hats AGAIN!!


Remember these cute little party hats that I made a couple of weeks ago... Well, today I am showing a more "refined/mature" party hat that women could wear!! I had the help of family friend on this project because it required some sewing-- I will get the hang of that this summer!!


To begin, you will need a few things:


--embroidery paper


-- ribbon


--sewing machine


--hot glue gun


We began by giving the ribbon a little more character. First, we pressed the ribbon with a crease to help guide our stitches. Then, we sewed a line straight through the center of the ribbon. Next, we pulled one thread and bunched up the ribbon. This was tedious and I was so afraid to break the thread; but it was strong!


And viola! We had cute ribbon!


Our next step was cutting the paper. We did a 51/2" sized hat and marked off 51/2" in a few spots on the paper to guide our scissors. Then, we added the ribbon. We tried our best to stay right on top of the first stitch!


With the left over ribbon, you could add a little rosette to the top of the hat! I then hot glued the hat to the headband so that it could be more easily. I hate the elastic strap that is on party hats-- I think the headband makes for an easy on and off! Just a dot or two on the ribbon will keep the hat in place on the headband!


ENJOY!


I am linking up to:


The DIY Show Off


The Girl Creative


craft


A Crafty Soiree


A Little Knick Knack


Tip Junkie handmade projects


Tatertots & Jello


Creations by Kara


It's FUN to Craft


It's a Hodgepodge Life

Thursday, April 14, 2011

This week at my house...


I would like to introduce you all to the newest member of our dining room family:


Please ignore the huge mess on top. Taylor's law school graduation is just around the corner and I have been writing out mailing addresses all week long! I am going to jump for joy when that job is complete.


Then we, well Taylor, will be moving right into Thank you cards! I am in the midst of planning the big celebration meal afterwards at our house! So far-- these all look like great ideas!


via


via


Hope you all have a great weekend!


Monday, April 11, 2011

Party Hats


I made the CUTEST party hat for a little girl last week and I wanted to share it with you all! I am not the best at tutorials so hopefully this will make sense! This party hat was for a 9 year old.


Materials:


8 1/2 x 11 Scrapbook paper-- choose according to your theme


hot glue gun and at least 1 stick


feather boa-- again choose a color according to your theme


A headband


Felt


To begin, you need to draw the outline of the cone on paper. I googled a template, that was easy! I found one on http://www.craftathome.com/. Next you need to glue the cone together. Then trace a circle on the felt ( I used chalk) and cut it out. The felt needs to be glued on the bottom side of the headband so that it sits on the hair. The cone will then be glued on top of the felt. Lastly, I trimmed the cone with pink feather boa! That added just the perfect touch!


Enjoy!

The perfect birthday party accessory!!


I'm Linking up to: http://thediyshowoff.blogspot.com/ http://itssoverycheri.com/ http://www.betweennapsontheporch.blogspot.com/ http://www.thegirlcreative.com/ http://makingtheworldcuter.blogspot.com/ http://sumossweetstuff.blogspot.com/ http://madincrafts.blogspot.com/ http://www.craftskeepmesane.blogspot.com/ http://craftomaniac.blogspot.com/ http://www.skiptomylou.org/ http://www.yesterdayontuesday.com/ http://www.craftedition.blogspot.com/ http://www.hopestudios.blogspot.com/ http://www.beckieandbrad.blogspot.com/ http://733blog.blogspot.com/ http://somedaycrafts.blogspot.com/ http://nightowlcrafting.blogspot.com/